
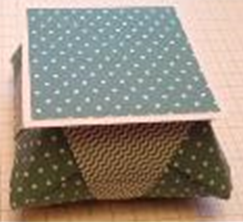
This year I've been sharing this gorgeous little gift box with my customers and just finally getting round to catching up with posting Tutorial.

Like so many
of my crafting friends and Stampin’ Up! colleagues, I have a huge stash of 12”
scrapbook paper that is crying out to be used.
As long as it is a perfect square, this box can be made from any size Designer Series Paper, just adjust the lid to fit your finished box.
For this box, I started with a 9” square DSP. Set aside the leftover
strips to use on the lid and a coordinating card.
1. With pattern you want on outside of the box facing downwards, fold in half along straight edges. Burnish edges with a bone folder. Turn and do the same in the other direction.
2. Fold one side only point to point diagonally and burnish edges. Fold back on itself and fold the same fold facing the other directions and burnish.
3. With open end pointing towards you, find centre line and leaving point nearest you, bring right hand point to centre, burnish and repeat with left hand point.
4. Turn over and repeat on the other side.


5. ‘Squish’ folds, lining up crease with crease
to keep square and repeat on all four sides.


6. Turn over to the inside and fold back the
last panels made as in photo. Fold
points down, level with the next section as in photo, and repeat on all 4
sides, turning ‘pages’ as you go.


7. Lift out 4 points and gently ‘pop’ out the sides
to make box.

8. Glue down points using red tape,
rolling round under curve of box base. I
like to use a mini glue dot on the tip if needed.
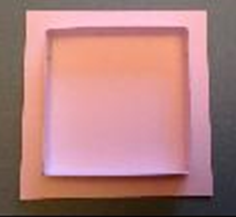
For the LID
1. Cut ONE piece of cardstock 3” square and score on all four sides at 1cm.
2. Snip corners on opposite sides and make into a shallow box.
3. Attach a 2¾“ piece of DSP onto 3" square of card.
4. On the back of the card & DSP piece, mark centre point and punch a small hole.
5. Fold a small piece of ribbon in half and push through hole from the wrong side, making a neat loop of the front. Tape the ends of ribbon flat on the inside.
6. Stick ‘box’ into centre of flat square to
make lid, as in photo.

Decorate your box as you wish.
I hope you have been inspired by my project today and hope you will make some yourselves.
Happy craftin'
Sandra
Contact me on : 07806
616704
For all your Stampin' Up!
requirements and Special Offers, please visit :
MY ONLINE SHOP http://www.stampinup.net/esuite/home/sandraroberts
HOSTESS CODE for DECEMBER is 2RQ2TRGW
Remember to quote this when you
order from my Online Shop to receive random acts of kindness 'thank-you' from
me after the end of the month.
No comments:
Post a Comment
Thank you for your comments, I really appreciate hearing from you, x